move_base 패키지와 파라미터 공부
rbiz 푸드 딜리버리 챌린지를 준비하면서 오랜만에 move_base를 써보게 되었는데, 오랜만에 보니 헷갈리기도 헷갈리고 뭐가 뭔지 모르겠는 느낌이었다. 그래서 공부한 내용을 정리하기로 했다.
혹시 몰라 적어두는 나의 SLAM & Navigation 실행환경은 아래와 같다.
- Ubuntu 20.04.6 LTS Focal Fossa
- ROS Noetic
move_base란?
move_base 노드는 (모바일)로봇의 navigation stack과 상호작용하기 위한 ROS 인터페이스(토픽, 서비스, 액션, 파라미터)를 제공한다. 아래 그림(화이트 테마를 키고 보자.)은 일반적인 모바일 로봇의 navigation stack 설정을 나타낸 그림이고, 그 중에서도 가운데 네모가 move_base 노드의 구조를 나타낸다.
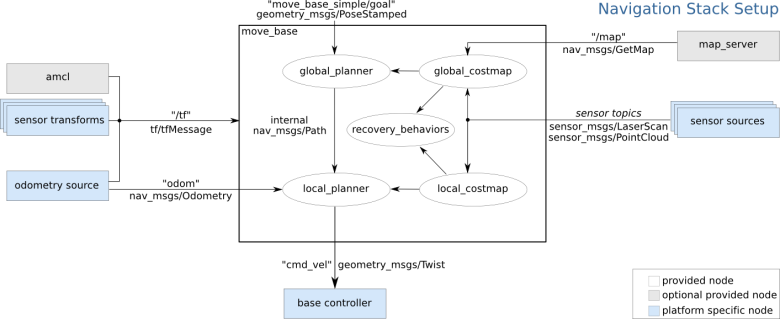
파란색 부분은 로봇(플랫폼)에 따라 달라질 수 있는 부분이고, 회색 부분은 부가적이지만, 모든 시스템을 위해 제공된다. move_base 노드는 이러한 시스템 및 부가적으로 발행되는 정보들과 맞물려서, 로봇이 목적 자세(goal pose)를 달성할수 있도록 한다.
아무튼, move_base 부분만 보면
- global_planner
- global_costmap
- local_planner
- local_costmap
- recovery_behaviors
로 구성되어 있다.
우선 Costmap이란 것은 grid cell로 구성되어 있는 지도(occupancy grid map)에서 각 셀들이 장애물/지형의 특성 등을 반영한 cost 값을 가지는 것이다.
Recovery Behavior
move_base의 Recovery Behavior 시행 순서는 아래 그림과 같다.
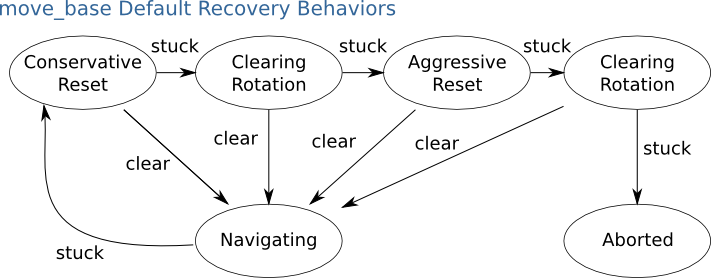
- 사용자가 설정한 영역외의 장애물들을 로봇의 지도에서 제거한다.
- 가능하다면, 로봇은 영역을 초기화하기 위해 제자리 회전 수행한다.
- 위 과정이 실패하면, 로봇은 모든 장애물들을 제자리 회전이 가능한 사각형 밖으로 제거해버린다. 그리고 또다른 제자리회전을 수행한다.
- 만약 죄다 실패한다면, 목표가 도달불가능한지 고려한 후, 그에 따른 보류 메세지를 출력한다.
파라미터 파일(yaml) 설정
move_base의 launch파일을 보면, rosparam으로 여러 yaml파일을 설정해준다. 대략적인 파일은 아래와 같다.
move_base_only.launch

<launch>
  <node pkg="move_base" type="move_base" respawn="false" name="move_base" output="screen">
    <rosparam file="$(find pkg)/params/costmap_common_params.yaml" command="load" ns="global_costmap"/>
    <rosparam file="$(find pkg)/params/costmap_common_params.yaml" command="load" ns="local_costmap"/>

    <rosparam file="$(find pkg)/params/map_nav_params/local_costmap_params.yaml" command="load"/>
    <rosparam file="$(find pkg)/params/map_nav_params/global_costmap_params.yaml" command="load"/>
    <rosparam file="$(find pkg)/params/base_local_planner_params.yaml" command="load"/>
    <rosparam file="$(find pkg)/params/move_base_params.yaml" command="load"/>

    <param name="base_global_planner" type="string" value="navfn/NavfnROS"/>
    <param name="base_local_planner" value="base_local_planner/TrajectoryPlannerROS"/>
    <param name="clearing_rotation_allowed" value="true"/>
    <!--remap from="odom" to="/odometry/filtered" /-->
  </node>
</launch>

위 경로는 본인의 경로에 맞춘 것이므로, 각 yaml파일들의 경로는 사람마다 다를 수 있음.
rosparam으로 선언된 파라미터들을 보면, 총 5개의 launch파일들을 태그하고 있다.
- costmap_common_params.yaml
- local_cost_params.yaml
- global_cost_params.yaml
- base_local_planner.yaml
- move_base_params.yaml
Costmap Configuration
Navigation stack에서는 장애물 정보가 담긴 2개의 costmap을 사용한다. 하나는 global planning(전체 환경에서의 계획)에 사용되는 global costmap, 다른 하나는 local planning과 장애물 회피에 사용되는 local costmap 이다.
이 두 costmap에 관한 설정을 해줘야 할텐데, global, local costmap이 공통으로 적용되는 설정은 costmap_common_params.yaml에, 각각의 설정은 local_cost_params.yaml, global_cost_params.yaml에 담겨있다. 여기서는 중요한, 그리고 내가 사용한 파라미터 위주로 간단히 훑을 것이다.
우선 costmap_common_params.yaml부터 보자.
#---standard pioneer footprint---
#---(in meters)---

footprint: [[-0.3, -0.25], [-0.3, 0.25], [0.3, 0.25], [0.3,-0.25]]
footprint_padding: 0.03

# Acceptable errors in the robot's sensor data or in areas related to positional transformation
transform_tolerance: 0.1
map_type: costmap

always_send_full_costmap: true

obstacle_layer:
 enabled: true
 obstacle_range: 2.0
 raytrace_range: 4.0
 inflation_radius: 0.2
 track_unknown_space: true
 combination_method: 1
 observation_sources: scan
 scan: {sensor_frame: base_link, data_type: LaserScan, topic: /scan_filtered, marking: true, clearing: true}

inflation_layer:
  enabled:              true
  cost_scaling_factor:  10.0  # exponential rate at which the obstacle cost drops off (default: 10)
  inflation_radius:     0.3  # 0.5, max. distance from an obstacle at which costs are incurred for planning paths.

static_layer:
  enabled:              true
  map_topic:            "/map"
- footprint: 로봇의 바운더리 설정, 점을 하나씩 추가 할때마다, 로봇의 바운더리 다각형의 꼭짓점 수가 늘어남
- footprint_padding: footprint의 여유공간, 로봇이 충돌하지 않기 위해 여유공간(패딩)을 주는 것
- transform_tolerance: 로봇의 위치변환(tf)에 대한 허용 오차, 로봇의 현재 위치와 센서 데이터간의 차이가 이 값 이내로 허용됨
- obstacle_range: costmap 상에서 장애물을 인지할 최대 거리를 의미함
- raytrace_range: 주어진 센서값으로 얼마나 탐지 및 초기화할 것인지에 대한 거리
- inflation_radius: 장애물 주변 팽창(패딩) 거리, 로봇이 장애물에 가까이 다가가지 않도록 해줌
정도가 있다.
다음은 local_costmap_params.yaml이다.
local_costmap:
  global_frame: odom # map
  robot_base_frame: base_link
  update_frequency: 5.0
  publish_frequency: 2.0
  static_map: false
  rolling_window: true
  width: 4.5
  height: 4.5
  resolution: 0.05
  transform_tolerance: 0.3
  inflation_radius:     0.1

  plugins:
   - {name: static_layer,        type: "costmap_2d::StaticLayer"}
   - {name: obstacle_layer,      type: "costmap_2d::ObstacleLayer"}
   - {name: inflation_layer,     type: "costmap_2d::InflationLayer"}
- global_frame: costmap이 실행되는 기준 좌표계
- update_frequency: costmap 갱신 주기(Hz)
- publish_frequency: costmap의 시각화(visulization) 퍼블리시 주기(Hz)
- static_map: costmap이 외부에서 (저장된)지도를 (map_server를 사용해서)가져오는지 여부
- rolling_window: 로봇이 전진할 때, costmap이 로봇을 중심으로 하는지 여부
- width, height, resolution(meters/cell): costmap의 너비, 높이, 해상도 설정, 해상도는 사용하는 static map의 해상도(map.yaml??)과 달라도 괜찮으나, 보통 동일하게 설정
- transform_tolerance, inflation_radius는 위와 동일
- plugins: local_costmap에 적용할 레이어(플러그인)을 설정하는 부분
- static_layer: 정적 맵 레이어, 외부에서 제공되는 지도정보를 기반으로 만들어진 costmap layer
- obstacle_layer: 로봇 주변 장애물 기반 costmap layer
- inflation_layer: 장애물 주변의 cost를 높인 팽창 layer
이어서 global_costmap_params.yaml이다.
global_costmap:
  global_frame: /map
  robot_base_frame: base_link
  update_frequency: 5.0
  publish_frequency: 0.5
  static_map: true
  transform_tolerance: 0.3

  plugins:
    - {name: static_layer,            type: "costmap_2d::StaticLayer"}
    - {name: obstacle_layer,          type: "costmap_2d::VoxelLayer"}
    - {name: inflation_layer,         type: "costmap_2d::InflationLayer"}
이미 위에서 다 언급된 파라미터이기 때문에 따로 설명하지 않는다. 위에서 정리한 파라미터들은 Navigation Configuration ROS Wiki를 기반으로 작성하였다. 전체 costmap 옵션 대한 설명은 costmap_2d ROS Wiki를 참고하면 된다.
Base Local Planner Configuration
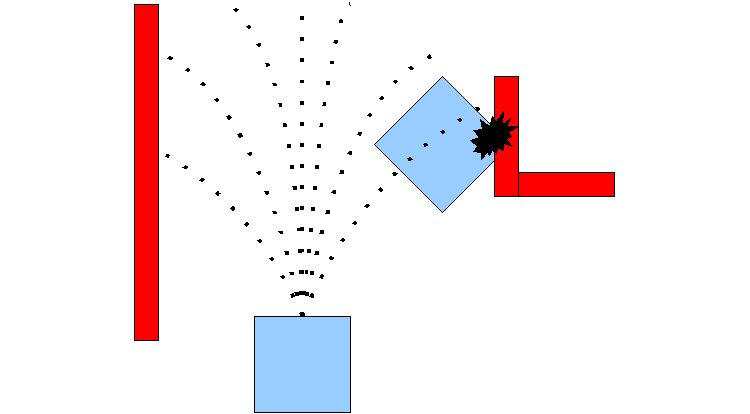
base_local_planner는 로봇의 베이스의 속도 명령을 계산하는 역할을 한다, 즉 평면상에서 모바일 베이스를 구동하는 컨트롤러를 제공한다. planner는 각 경로에 해당하는 grid cell들의 cost가 최소가 되도록 경로를 생성한다. 다음은 예시가 되는 DWA 알고리즘의 그림이다.
base_local_planner에 대한 더 자세한 설명은 base_local_planner ROS Wiki를 참고하자.
base_local_planner 파라미터는 당연히 사용자가 가지고 있는 로봇의 스펙에 맞춰 작성해야 한다.
다음은 나의 base_local_planner.yaml파일이다.
TrajectoryPlannerROS:
  # 로봇의 속도에 관한 파라미터
  max_vel_x: 2.0
  min_vel_x: 0.1
  max_vel_theta: 1.0
  min_vel_theta: -1.0
  min_in_place_vel_theta: 1.0

  # 로봇의 가속도에 관한 파라미터
  acc_lim_x: 3.0
  acc_lim_theta:  2.5

  holonomic_robot: false
  escape_vel: -0.2

  # 목표지점 도달 허용범위
  yaw_goal_tolerance: 0.157
  xy_goal_tolerance: 0.25
  latch_xy_goal_tolerance: false

  # 전방 시뮬레이션 파라미터
  sim_time: 1.0
  sim_granularity: 0.02
  angular_sim_granularity: 0.02
  vx_samples: 6
  vtheta_samples: 20
  controller_frequency: 20.0

  # Trajectory scoring parameters
  meter_scoring: true # Whether the gdist_scale and pdist_scale parameters should assume that goal_distance and path_distance are expressed in units of meters or cells. Cells are assumed by default (false).
  occdist_scale:  0.1 #The weighting for how much the controller should attempt to avoid obstacles. default 0.01
  path_dist_scale_bias: 2.5  #     The weighting for how much the controller should stay close to the path it was given . default 0.6
  goal_dist_scale_bias: 1.0 #     The weighting for how much the controller should attempt to reach its local goal, also controls speed  default 0.8

  heading_lookahead: 0.1  #How far to look ahead in meters when scoring different in-place-rotation trajectories
  heading_scoring: false  #Whether to score based on the robot's heading to the path or its distance from the path. default false
  heading_scoring_timestep: 0.8   #How far to look ahead in time in seconds along the simulated trajectory when using heading scoring (double, default: 0.8)
  dwa: true #Whether to use the Dynamic Window Approach (DWA)_ or whether to use Trajectory Rollout
  simple_attractor: false
  publish_cost_grid_pc: true

  #Oscillation Prevention Parameters
  oscillation_reset_dist: 0.25 #How far the robot must travel in meters before oscillation flags are reset (double, default: 0.05)
  escape_reset_dist: 0.1
  escape_reset_theta: 0.1

# BaseGlobalPlanner:
#   allow_unknown: false
#   use_dijkstra: false #Use A* instead
#   use_quadratic: true
#   use_grid_path: false
#   old_navfn_behavior: false
간단한 파라미터는 주석을 달아놓았으며, 그 외 설명은 다음과 같다.
- holonomic_robot: holonomic 로봇 기반 속도명령을 생성할지 여부
- escape_vel: 로봇의 탈출 속도(m/s), 로봇이 실제로 후진해서 탈출하기 위해서는 음수값이어야 함
- sim_time: 궤적을 전방 시뮬레이션하는데 걸리는 시간
- sim_granularity: 주어진 궤적에서 점 사이 간격(m)
- vx_sample: x속도 공간을 탐사할때 사용하는 샘플의 개수
등이고, 모든 파라미터에 대한 설명은 base_local_planner ROS Wiki를 참고하자.
move_base configuration
마지막으로, move_base_params.yaml에 관한 설명이다.
shutdown_costmaps: false

controller_frequency: 20.0
controller_patience: 15.0

planner_frequency: 20.0
planner_patience: 5.0

oscillation_timeout: 0.0
oscillation_distance: 0.5

recovery_behavior_enabled: true
clearing_rotation_allowed: false # true, 로봇이 회전을 통해 효과적으로 장애물을 제거하거나 회피할 수 있다면 true로 설정하는 것이 좋을 수 있습니다
- shutdown_costmaps: move_base가 비활성화 상태일때 costmap도 중지할 것인지 여부
- controller_frequency: 로봇 베이스에 속도 명령을 전달하는 주기 및 제어 주기(Hz)
- controller_patience: 공간 초기화 작업을 수행하기 전에 컨트롤러가 제어를 받지 않고 몇초간 기다릴 것인가
- planner_frequency: global planning loop를 수행하기 위한 주기(Hz), 0.0으로 설정 시, 새로운 goal을 받거나 local planner가 경로가 막혔다고 판단하는 경우에만 global planner가 동작
- planner_patience: planner가 공간 초기화 작업을 수행하기 전 유요한 계획을 찾기 위해 몇초간 기다릴 것인가
- oscillation_timeout: 복구 동작을 실행하기 전 진동을 허용하는 시간(초), 0.0으로 설정 시 infinite timeout
- oscillation_distance: 로봇이 진동하지 않는다고 간주되기 위해 얼마나 움직여야 하는지(m)
- recovery_behavior_enabled: 공간을 초기화하기 위해서 move_base 복구 동작(recovery behavior)를 사용할 것인지 여부
- clearing_rotation_allowed: 로봇이 공간을 초기화하기 위해 제자리 회전을 시도할 것인지 여부, 로봇이 회전을 통해 효과적으로 장애물을 제거하거나 회피할 수 있다면 true로 설정
move_base_params에 대한 모든 파라미터 설명은 move_base ROS Wiki를 참고하자.